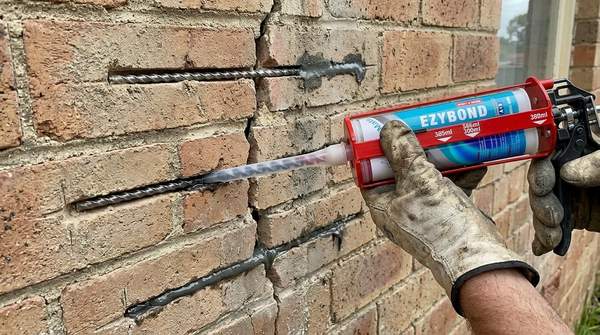
Once a mortar joint has been cut and cleaned for crack stitching, the installer faces a material decision that affects the next several stages of work. The chosen bedding product must surround the helical bar, make suitable contact with the masonry and remain workable while the reinforcement is positioned.
HeliMate Australia supplies EzyBond two-part anchoring epoxy and EzyGrout cementitious grout for compatible helical-bar repairs. Both belong to its masonry reinforcement range, but they call for different equipment, preparation methods and installation routines.
Compare EzyBond and EzyGrout at the Work Face
The choice is easiest to understand by looking at what a crew actually handles. EzyBond is a cartridge-based resin system; EzyGrout is a cementitious material mixed before placement into the prepared joint.
| Feature | EzyBond anchoring epoxy | EzyGrout cementitious grout |
|---|---|---|
| Material system | Two-part epoxy | Cementitious grout |
| Listed supply formats | 420ml twin cartridge, plus five- and ten-pack options | 5-, 10- and 20-litre container options |
| Preparation | Fit cartridge and static mixing nozzle | Mix material to the specified workable consistency |
| Placement equipment | Compatible dual-barrel applicator | Suitable grout-placement or pointing equipment |
| Main work-sequence consideration | Dispensing and cartridge working conditions | Mixing quantity and prepared-material working time |
| Next stage | Follow product curing requirements before finishing | Follow product curing requirements before finishing |
Both products can feature in HeliMate helical reinforcement installations when the chosen system meets the repair specification. The application method determines how the team prepares the material and organises each run of joints.
What EzyBond Brings to a Brick-Stitching Job
EzyBond is supplied in a 420ml twin cartridge containing two components. A compatible applicator advances the materials through a static mixing nozzle, allowing the installer to place mixed epoxy directly into the prepared chase.
HeliMate sells a dedicated 420ml double-barrel epoxy gun for its EzyBond 1:1 cartridge system. The paired components and mixing nozzle form a defined dispensing arrangement, which is particularly convenient to organise for discrete repair locations.
Imagine an approved reinforcement job containing several separated cracks around a house. The team might prepare one area, load the cartridge system and bed the bars before moving to the next location, following the epoxy’s application and working-time requirements.
The cartridge format provides a way to handle those separate placements without preparing grout in a mixing container. HeliMate offers individual EzyBond cartridges as well as five- and ten-pack quantities, so the material can be included in a small repair order or a larger trade enquiry.
How EzyGrout Changes the Work Sequence
EzyGrout is HeliMate’s cementitious bedding option, available in 5-, 10- and 20-litre listed container sizes. Its preparation involves mixing material to a suitable consistency before loading or placing it into the prepared masonry joints.
For a project with many adjoining reinforcement runs, the crew can organise a sequence of joints ready to receive grout and prepare a quantity appropriate to the installation work. The mixing equipment, placement method and permitted working time become part of that plan.
A cementitious grout also introduces its own surface-conditioning and curing requirements. Those details follow the applicable product instructions and the specified masonry repair, rather than assumptions drawn from ordinary pointing mortar.
HeliMate’s helical-bar installation guide includes EzyGrout alongside EzyBond as a bedding option. That gives contractors access to both material categories through the same specialist reinforcement supplier.
Understand the Bond Inside the Joint
A helical bar is embedded across a masonry crack to help connect the affected sections of wall. Its twisted steel profile interacts with the bonding material, which occupies the prepared slot and contacts the surrounding bricks and mortar.
The arrangement relies on proper bedding around the bar, including suitable contact along the prepared joint. Empty pockets or loose material in the chase can interrupt that contact and affect the completed reinforcement assembly.
HeliMate supplies 6mm and 8mm straight helical bars, each 1,000mm long, plus corresponding coil products. The repair design establishes where those bars sit and how much sound masonry they must engage beyond the fracture.
Once that detail is established, the bonding product can be matched to the specified installation system. The material, reinforcement and prepared substrate then form a single repair assembly with defined application requirements.
Joint Preparation Comes Before Either Material
Brick stitching commonly uses selected horizontal mortar joints to conceal reinforcement within the existing wall. Those joints must be prepared to the required dimensions while preserving sound adjacent brickwork.
Mortar cutting can leave fine debris inside the chase, especially in weathered joints. HeliMate’s installation method includes brushing and suitable removal of dust and loose material before the bedding product is introduced.
The condition of the substrate also affects placement. Crumbling mortar, damaged bricks or an irregular slot may need attention before the crew can create a continuous bedding layer around the reinforcement.
Appropriate dust controls are essential during cutting, particularly because brick and mortar preparation can generate respirable crystalline silica. The repair team can then examine the clean joint and proceed with the bonding system selected for the work.
Follow the Installation Sequence
HeliMate’s installation guidance describes a straightforward pattern for placing either product. The project specification and the selected product’s technical instructions determine the actual slot dimensions, material quantities and curing conditions.
- Prepare the specified joint. Cut the approved horizontal chase across the damaged masonry, then remove dust and loose mortar using suitable safety controls.
- Prepare the bonding material. Load EzyBond into the compatible applicator with its mixing nozzle, or prepare EzyGrout using the specified mixing method.
- Place the first bedding layer. Apply material along the prepared joint to create contact with the masonry surfaces intended to receive the reinforcement.
- Insert the helical bar. Position the specified HeliMate bar within the bedding layer, following the approved alignment and anchorage detail.
- Complete the encapsulation. Place further material around the reinforcement according to the installation requirements, avoiding gaps in the intended bond.
- Finish at the correct stage. Observe the product’s curing requirements, then restore the exposed mortar joint with an appropriate pointing finish.
These steps keep the focus on creating a consistent bonded installation. They also help a crew sequence cutting, cleaning and material preparation so the product can be placed within its permitted working conditions.
Curing Time Affects the Construction Programme
HeliMate’s general installation guide gives indicative curing information for EzyBond and directs installers to the grout datasheet for EzyGrout. Actual curing requirements depend on the product and conditions of the job, including the substrate and surrounding temperature.
A repair programme should account for the point at which the bedding material is ready for repointing and any subsequent work. This becomes particularly important near an opening, on an occupied building or where several repair activities share the same access equipment.
The sequence can be organised around the specific product, rather than relying on a generic epoxy-versus-grout cure-time comparison. It allows installation, finishing and inspection to occur in the order required by the approved system.
Supply the Steel and Bedding Material Together
HeliMate’s catalogue brings its 6mm and 8mm stainless steel helical bars together with EzyBond, EzyGrout and associated application equipment. Contractors can identify the specified reinforcement and bedding products within one trade supply range.
The purchasing formats support different scopes of work. EzyBond’s cartridge packs suit orders described in cartridge quantities, while EzyGrout’s container sizes can be assessed against the volume and preparation method required by the job.
For a larger repair, the material schedule can group joint lengths and the selected bonding product by work location. That gives HeliMate a concrete basis for discussing quantities, applicators and other supplies through its product and bulk-enquiry channels.
Questions About EzyBond and EzyGrout
Can Both Products Be Used for Brick Stitching?
EzyBond and EzyGrout both appear in HeliMate’s helical-bar installation guidance. The repair design and product instructions determine which bedding material suits the particular masonry and reinforcement arrangement.
What Equipment Does EzyBond Need?
EzyBond uses a dual-cartridge applicator and static mixing nozzle. HeliMate supplies a compatible 420ml double-barrel gun for its 1:1 cartridge system.
Is EzyGrout the Same as Repointing Mortar?
EzyGrout is the cementitious bedding product used around suitable reinforcement, while repointing mortar forms the exposed joint finish. The two stages have different material and performance requirements within the completed repair.
Choose a Bonding System From HeliMate Australia
EzyBond and EzyGrout give contractors two practical application systems for embedding helical bars, with different preparation methods and purchasing formats. Contact HeliMate Australia with your repair specification to discuss the appropriate bonding product, compatible equipment and reinforcement supplies for the installation.